Recipes by their Ingredients

white pepper

  • Char Siu Bao (Baked BBQ Pork Buns)

    Char Siu Bao
    Char Sui Bao
    (Makes 6-8)


    Filling
    Char Siu Pork, ¼ to ½ inch cubes

    Filling Sauce
    2 tblsp Char Siu Sauce (marinade)
    1 tblsp Oyster sauce
    1½ tblsp dark soy sauce
    1 tblsp Sesame oil
    1 tsp white pepper
    1 tsp Chinese 5 spice
    2 tblsp sugar
    1 tsp scallion oil, optional

    Slurry (thickener for filling)
    2 tsp cornstarch
    2 tsp water

    Bao
    400g strong bread flour
    25g butter
    70g fine sugar
    2g salt
    7g fast action dry yeast
    200g warm water (the yeast I use requires the liquid be 120-130 degrees F.)

    Egg Wash
    1 egg
    1 tblsp milk or water


    NOTES:The bread measurements are all in grams because being exact in baking recipes almost always means you will get a great result! There was not any dough that was too sticky and it just takes the guess work out of the equation! I have used a version of this model for years!

    For the pork, I used a boneless butt/shoulder, cut into 1 inch by 1 inch and however long they are logs. Marinate for 2-3 days in your char siu marinade. Using a grill, bbq the pork, we like small really dark areas, yes they look a little burnt here and there, but are actually a combination of the sugar over-carmelizing and the char of the grill. In my circle of friends this is now known as "candy meat"!
    After grilling, let them rest and then cube up the Char Siu Bao portion and set aside, (save any leftover for another meal!

    For the filling sauce, in a small cup, mix the corn starch and water together to form a 'slurry' which will be used to thicken the filling sauce and set aside.
    Add the rest of the ingredients to a small sauce pan, mix together and turn on the heat to medium until the misture is boiling, then turn the heat down to low, and add a tblspoon of the hot mixture to the slurry mixing while you pur it in, once mixed add back to the hot sauce pan miixture stirring while your adding it. now let the sauce come to a simmer and let it reduce until its super thick and sort of oozes, this will take between 2 and 5 minutes depending on the stove heat. Once thick set aside let cool, if you want, transfer the mixture to a different bowl to facilitate cooling.

    For the Bao, Let the yeast bloom (5-10 minutes) after adding warm water and a tblsp of the sugar from the 70 grams.
    Add all the flour to a mixer with a dough hook. (Or you can hand mix it) Add the salt and sugar mix until blended.
    Now add half of the bloomed yeast/water mixture, mixing on low speed, then slowly add the remaining yeast/water until it is all incorporated and a dough forms, you may need a rubber spatula to scrape down the sides or stir up the bottom.
    Now add push the softened butter into the dough and let the mixer run at slightly faster then medium speed for 4 minutes. Make sure the butter isn't pooling outside the dough and gets mixed in to it.
    Remove the dough and hand kneed for a minute and form a ball, pulling the top to the bottom to create surface tension before resting in a lightly oiled bowl covered with a damp tea towel for 1½ hours. (There are plenty of YouTube videos with bakers forming the dough balls.)
    After 1½ hours rising, divide the dough in to 6 parts for large baos (about 4 oz each) or for smaller baos divide into 8 pieces.

    Putting it all together: Roll the bao pieces into circles 3-4 inches in diameter, then add a heaping tablespoonful of the filling into the center, pull up 2 opposite sides together without the filling touching the edges or it will not stick together, pinch the sides then follow the 2 remaining areas that are left and pinch shut, bring the pinched ends together crimping the dough together so they do not leak during baking and then the seem ends up at the bottom of the bun.
    Put them on a cookie sheet lined with parchment paper and best if you have one insert a rack in the tray and add the parchment paper to the rack grid rack lined with parchment paper insted of the cookie sheet. This will prevent the bottom from burning. Let them rise for 30 minutes once filled.
    After the 30 minutes, brush the tops and sides with the egg wash.
    Put them in the center of a pre-warmed oven at 350 degrees F. for 15-20 minutes. I always take a look at them after 10 minutes in any case. You never know. They should look golden brown and delicious when they are done!

  • Salt and Pepper Pork Chops

    Salt and Pepper Pork
    Salt and Pepper Pork
    (Serves 2-4)


    Main Ingredients
    1 lb thin sliced pork loin or pork chops
    ¼ red bell pepper, chopped
    ¼ onion, chopped
    ¼ green bell pepper, chopped
    1 stalk green onion, thin slices
    ½ red chili pepper, thin slices
    2 cloves garlic, minced

    Marinade
    2 tblsp corn starch
    ½ tsp baking soda
    1 tblsp cooking wine
    1 tblsp oyster sauce
    1 tblsp light soy sauce
    1 tblsp water
    1 tsp sugar
    ½ tsp salt

    Other Ingredients
    2 cups vegetable oil
    ½ egg
    6 tbsp corn starch

    Seasoning 1 tsp garlic salt
    ¼ tsp salt
    ¼ tsp white pepper


    NOTES: If your using pork tenderloin, I don't think you need to tenderize the pork slices. At the end when adding the garlic powder, salt whit pepper mix, I do it per pork slice and don't use what is left over, if any.
     

    You can use other cuts of pork and depending on your cut of pork, you can tenderize the pork by using either a meat tenderizing mallet, or the back of your chef knife on both sides.

    Mix the marinade ingredients together in a medium bowl and add the pork. Let marinate for 30-60 minutes.

    Chop all your main ingredient vegetables and set aside.

    After the pork has had time to marinate, heat the oil up in a sauce pan to 380°F. Meanwhile beat the ½ egg in a small bowl and pour the egg into the marinated pork and mix well.

    Add the cornstarch, 6 tbsp, onto a large plate. When the oil is at temperature, coat the pork chops or slices in the cornstarch and fry, one or two at a time until they are all fried a light golden brown. Now turn the oil up to 450°F. and fry the pork a second time for about 30 seconds and set aside.

    Now heat a wok or large frying pan on high heat, add 1 tsp oil, now add in the garlic, red chili pepper, and fry until it starts to be aromatic. Add the onion, bell peppers and fry for another 30 seconds.
    Add the scallions followed by all of the pork for about 30 seconds. Now gradually add in the seasoning to evenly coat all the pork chop pieces/slices.
    Cook for a further 20 seconds before turning off the heat.
    Continue mixing for 30 more seconds until the pork is evenly coated in the seasoning.

    Serve with a side of rice.

  • Thanksgiving Balls

    Thanksgiving Balls
    Thanksgiving Balls
    (Serves 4)


    Frozen Center Mixture
    4 pack 2 inch ice molds
    4 oz cranberry sauce, for the first 4
    4 oz turkey or beef gravy, for the second 4

    Turkey Mixture
    1 lb ground turkey
    ⅓ cup Italian Breadcrumbs
    1 medium egg
    ¾ tsp thyme
    1½ tsp salt
    ¼ tsp sage
    ¼ cayenne pepper
    ¼ white pepper

    Stuffing Layer 1 box of Stove Top Stuffing (Turkey Flavor)
    (Requires 4 tblsp butter and 1½ cups water)

    Mashed Potatoes
    2 russet potatoes, peeled, cut into even chunks
    4 tblsp sweet butter
    ⅓ cup whole milk
    2-3 tsp salt, to taste
    ¼ tsp white pepper

    ½ cup Italian breadcrumbs for coating the balls before frying


    NOTES:These can be baked, after rolling them in the breadcrumbs, spritz with spray release or olive oil and bake for 12-15 miniutes at 400°F. And the frozen center, you can freeze the bottom half first of gravy, then after 2 hours open and fill the rest of the way with cranberry sauce, then you will have a split center! make an exact amount, you need aproximately ¼ lb turkey for every extra ball you want. I suppose if you used the jelled cranberry sauce in a can you can simply cut out a 2x2 inch square and put that on top before rolling into a ball. Also the longer they remain in the refridgerator the more likely the bottom will get wet and the ball will leak a bit. So its best to time the dethawing of the center right before cooking. I had a few and let one sit a day and another sit two days, they both leaked but held together and ultimately fried perfectly.

    Place the gravy, once it has cooled down into the mold, up to the fill line only! Place the top of the mold on and gently push the top into the mold, hopefully very little will leak out the top hole, which allows the mold to be full but not too full! Fill the other molds with gravy and then 2 of them with cranberry sauce. (or just do one or the other depending on your likes! Place in the freezer until solid, at least 2 hours depending on your freezer. It easiest to make these a day in advance and use them once you have all the layers cooked and cooled (except for the turkey of course).

    Divide the turkey mixture into 4 balls. place a piece of plastic wrap down for each of the balls, or you can get one larger piece of plastic wrap and when its time to roll them, cut into four sections with a strait knife. Now for each of the turkey mixture balls get anothe top peice of plastice wrap a place on top of each ball, centering the balls between the plastic wrap, with a rolling pin, flatten the balls into a circle ¼ inch deep. Once all four are flattened remove and discard the top plastic wrap, leaving the bottom plastic wrap in place.

    Turkey before rolling

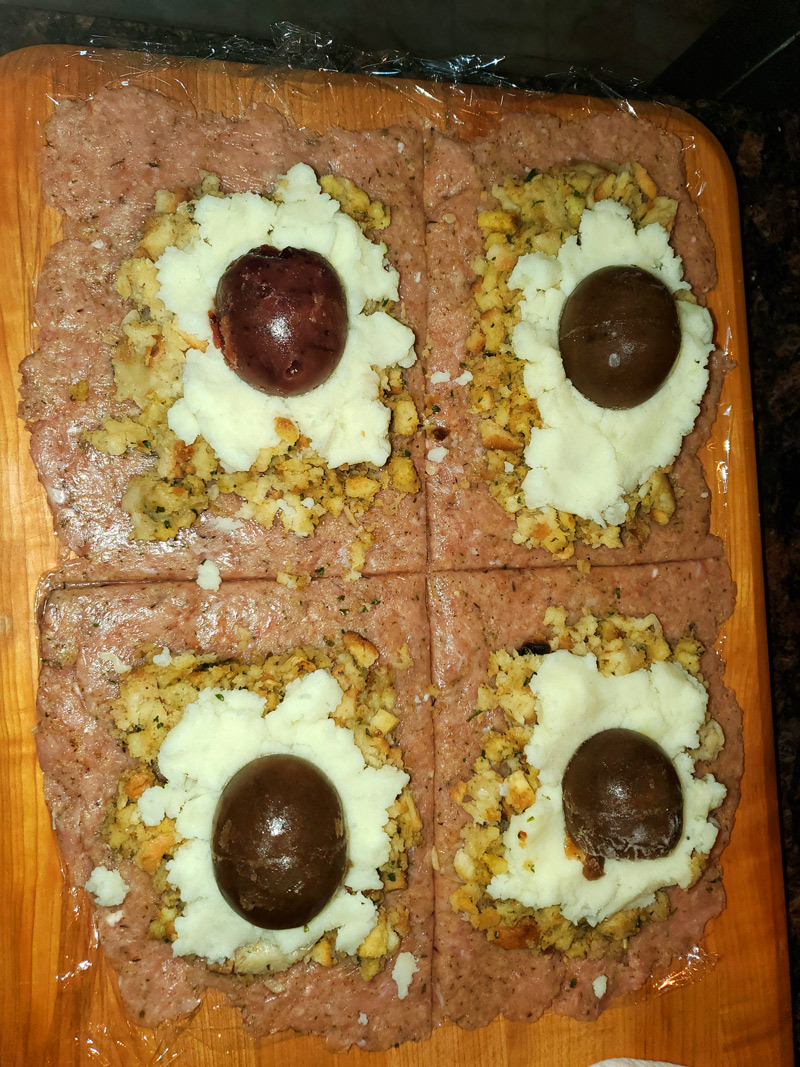
    Place a couple tablespoons of stuffing on top of each flat turkey patty right in the center and gingerly spreadit into a circle being careful not to flatten the already flattened turkey patty. make sure to leave some turkey showing on the edges of each patty.

    Now do the same with the mashed potatoes, place 2 tablespoons worth on top of the stuffing and spread out but not to the edges.

    pop the frozen gravy and/cranberry sauce out of their molds (remove the top and use a butter knife to pop it out). Place in the very center of each turkey patty into the mashed potatoes, press it in lightly.

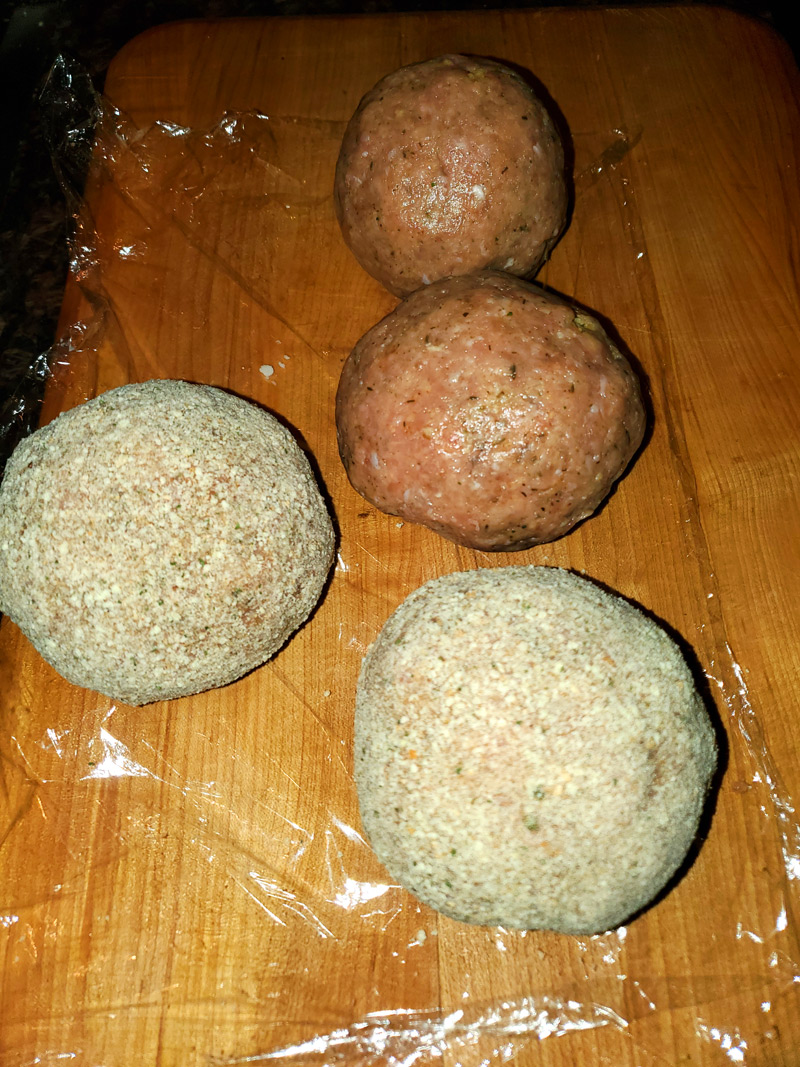
    Now using the plastic roll the edges as close together as you can and slip your whole hand under the turkey, we are now leaving the bottom plastic wrap behind as we finish cupping the ball in one hand and using our other hand to crimp together the turkey edges, once crimped together you can kind of roll the ball in your hands to some out and make round. But be sure the turkey has held together beacause once this goes in to cook the center will have gone from frozen to melted. So now they are held together and are round, you can roll them in the Italian breadcrumbs to get an even coat, then cover and put in the fridge to firm up the outside and let the center melt. I left mine in the fridge over night in tupperware. But leave in the fridge for 3-4 hours at least.

    Turkey after rolling

    I used a deep sauce pot to fry these in. Add ½ vegetable oil to a deep fry pan or sauce pan and put on medium low until it hits 350°F. Fry the giant turkey ball for a total of 8-10 minutes, let it fry for 1 minute at a time until all sections are golden brown, then keep the ball moving for the last three minutes to maintain an even brown coating

    You can present these on a giant platter for a guest to grab or what I did was, add a dollap or 2 of cranberry sauce in the center of the plate and place the ball on top, I finished mine off with a sprinkle of basil. You can always swap out the dollap of cranberry with: gravy, mashed potaoes, rice, cheese sauce, what ever hits your fancy!